Friday, July 17, 2015

Quicky #1 : Using Lithium AA Cells in Fenix LD12

Can we use Lithium AA cells in Fenix LD12 Flashlight?

Fenix LD12 and Energizer Ultimate Lithium AA size L91


Technical data:
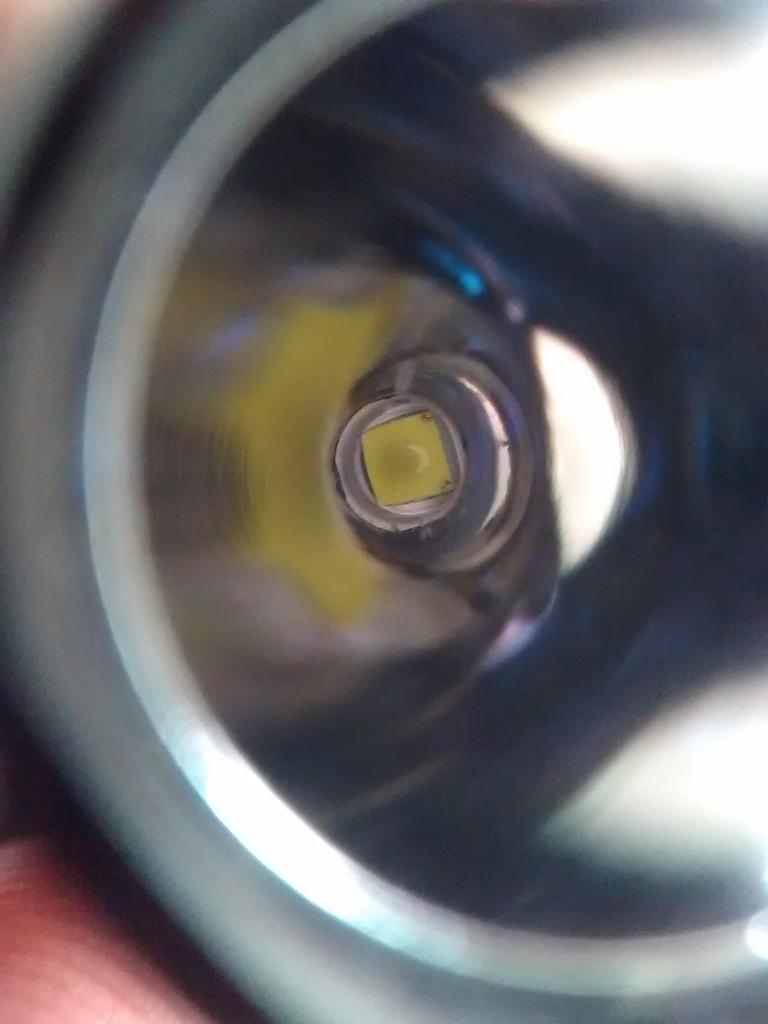
Fenix LD12 Features a  CREE XP-G2 (R5) LED.
CREE XP-G2 (R5) LED


This LED is capable of handling up to 1.5A at 3Volts (max 3.1V).


LD12 datasheet:
  • LD12 Flashlight is a 125Lm LED based Flashlight powered by one single AA 1.5V alkaline cell.
  • The same LED is found in the 215lm LD22 (and hopefully the same constant current protection) powered by two AA 1.5V cells (3V).
Fenix Flashlights are protected by a Constant Current LED driver circuit [source: Fenix catalog].

Energizer L91 Ultimate Lithium AA cell datasheet:
Energizer Ultimate Lithium AA size L91
  • 1.5V (1.8V out of the box)
  • max discharge: 3A continuous (5A pulse)
Do not confuse the L91 with the L92 which is limited to 1.5A or the Advanced Lithium (EA91 1.5A -EA92 1A) cells; those cells will work, but for a quite shorter time (i don't have enough reliable data to estimate the runtime yet).
--> To know more about these cells have a look at budgetlightforum.com user review here


Is it safe to use one Lithium AA battery to power LD12?
Yes.
  • Energizer Ultimate Lithium Cells (L91) are 1.5V Cells (1.8V with no load, out of the box, wich is safe as the LED can run with up to 3.1V power source)
  • These Cells can provide "up to" 3A but will NEVER burn the LED as the Constant Current driver will do its job.


But will it work with LD22?

Not sure if it will or not harm it : 

  • 2*1.8V=3.6V which is higher than the 3.1V of the LED, the constant current driver should limit voltage to keep current at a fixed threshold, but i don't have an LD22. 
  • There SHOULD have no issue, but who will try?


Tuesday, June 23, 2015

Using a Samsung 2A travel adapter with adaptive fast charging with MotoG : How does it behave? part 2 : more data


Materials and Methods
Trying to keep things objective
See Part one for for the tools used and limitations inherent to the method used.
A few precisions :
  • legend used in graphs:
    • Power-In (W) --> Power used by the samsung AC adapter
    • Power-Out (W) --> Approximated power delivered by the AC adapter
    • Out-disp (mA) --> Current displayed by Ampere App = Current received by the battery
    • Offset : +250mA (= Current used by the device idle, screen ON drain, wifi ON)
    • Offset (WifiOFF) : +160mA (= Current used by the device idle, screen ON drain, wifi OFF)
    • Out-real (mA) --> Current delivered by the AC adapter (out-disp + offset)
    • pm8226 T° (C) --> Temperature of pm8226_tz probe. (MotoG and MotoG 4G/LTE aka Falcon and Peregrine)
    • pm8110 T° (C) --> Temperature of pm8110_tz probe. (MotoE aka Condor)
    • Battery T° (C) --> Temperature given by battery probe
  • ...

Charging and Time
Monitoring battery charge and Current over time

Charging curve is pretty common with a linear charge until 60% and then the rate starts decreasing. Nothing special there.
Charging Current follows the same behavior, showing that the power regulator of the MotoG does its job correctly limiting charging current to safe levels.

Charging and Temperature
Monitoring pm8226 and pm8110 Temperatures and respective charging current over Battery charge

Before showing any graph, we should keep in mind that results are highly inconsistent, T° is directly related to the way device is really idle or not, things can vary from 46 to 57°C!
I had a peak T° of 57°C when using Youtube, twitter and a few services running while charging. Though this peak T° is quickly going down to 52°C and then stabilize at about 50°C back to idle state

Do not use your device for moderate to intensive tasks while charging it (with high power charger) or it will fry!

Concerning OFFline charging, i had no way to monitor, but power used by the AC adapter is still between 7.9 and 8.7W (like ONline charging. the Screen T° felt (the pm8226 module is behind the center of the screen) is as warm as online charging when pm8226 was at about 48°C; obviously a felt T° is not objective.

We can see that the adapter provides a fairly stable current (most variations might due to measurements inaccuracies.) until 60% of charge, then it drops (expected.). Though the power management module that is pm8226 is extremely HOT (50+°C!!) --> Why is that?
  • Doesn't it have an overheat protection? i'd love to investigate this...
  • Is the AC adapter output too powerful for it? No, as we see, the module is able to limit current in the end of charge so it should do it at any time.
  • Is the maximum Current accepted by the device to high for it? Motorola specifies the device to be able to charge with up to 1500mA, 1300 doesn't blow it up! I'm looking on a way to force a limitation to 1000mA and see if there are any improvements in T°


IMPORTANT : work hold on at this stage, i might continue it later. this article is published not to forget the already done part.

Saturday, June 20, 2015

Using a Samsung 2A travel adapter with adaptive fast charging with MotoG : How does it behave? part 1 : first overview

My old Sony-Ercisson 850mA charger is ageing and i needed a new and more powerful one. i Bought the Samsung 2A travel adapter with adaptive fast charging model EP-TA20EWEUGWW (white one, with French 2 pins male plug)
  • We can read everywhere that a charger will only provide what the device is capable to take, is that right?
  • Is that really safe to charge a MotoG (specified to be capable of charging between 550 and 1500mA by the manufacturer) on a 2A adapter?
In the way chargers work, it should be ok, but does the device really behaves the way it is intended to?


Materials and Methods
Trying to keep things objective
  • To monitor input Current:
    A wattmeter:
    It has a precision of +/- 1W that isn't precise at all, but this is only to roughly monitor the input current. ==> this inaccuracy will prevent me to give good efficiency predictions...

  • To "monitor" output current: Ampere
    the app is not meant to be accurate, the idea is only to have an approximation of the current delivered by the charger.
    • The device uses between 180 and 300 mA when idle, screen ON, wifi ON.
    • Ampere mesurements display current applied to the battery, not the one coming from the adapter; so we will add 250mA to the results (or 160 with the experiments without wifi).
    • Therefore if Ampere displays +1000 mA that would mean that the adapter provides about 1250mA and Battery gets 1000mA.
    • Considering previous experiments we can assume that the results are accurate at +/-100mA; this means that when Ampere displays 1000mA, the charger provides something between 1150 and 1350mA (displayed current +250 +/-100)
  • To monitor Temperature:
    Temperature is monitored with the pm8226_tz probe that looks like to be linked with the power manager of the battery -aka battery 'charger' when device is plugged to power source-
Chargers characteristics:
Sony: 5V 850mA
Samsung: 5V 2A or 9V 1.67A with fastcharging capable devicer (EP-TA20EWEUGWW)
For this first experiment the device was discharged down to about 50%


Efficiencies
When results are so inconsistent that you cannot really conclude -_-'
Sony at 50% charge:
  • Input power: 6W +/-1
  • Output power: 3.75~4.75W (5V 750~850mA)
  • Efficiency : 54~95% (worst_case~best_case)
Samsung at 50% charge:
  • Input power: 8W +/-1
  • Output power: 6.35~7.35W(5V 1270~1470mA)
  • Efficiency: 70~105% (No, current is not coming from anywhere, this 105% is due to the +/-1W inaccuracy of the input wattmeter!)

As best case condition cannot be used, let's see for worst cases:
Samsung worst case is above the sony's worst case so we can at least say that this adapter is NOT LESS efficient in this specific condition [50% battery, room temp @21°C ...]. As i don't have enough data yet -and the worst monitoring tools available- i am not able to say that the Samsung Charger is more efficient.


Overheating
When spare Watts become heat?

Sony at 50% charge :
Battery charging current was about 600mA meaning that the charger was providing 850+/-100mA, considering the charger cannot provide more than 850mA, the real value is somewhere between 750 and 850mA.
pm8226_tz T° is about 43°C, this threshold is never exceeded.

Samsung:
  • at 50% charge :
    Battery charging current was about 1120mA meaning that the charger was providing 1370mA+/-100 pm8226_tz rises up to 51°C until the 70-75% of charge are reached,
  • Then (70%+) current is limited to about 800mA and T° decrease slowly to reach 41°C at 80%.
  • At 89% current is only 400mA pm8226_tz only 37°C and the Input current is lowered at 3.2W.
  • When fully charged, idle and screen ON, the adapter still uses 1.9W from home circuit. which means that with an efficiency of about 70% the adapter provides about 226mA which corresponds to the device usage. When screen is OFF, the adapter input current drops under the watmetter detection threshold.

Here is a chart showing Charge Current and pm8226 Temperature against charging percentage.

Now, the questions are,
  • what happens before 50% ?
  • Does the adapter reaches the 1500mA that the device is theorically capable to handle?
  • Is the device really able to handle that much Current ?
  • How does the temperature increase if the device is NOT totally idle while charging?
  • Will the battery survive multiple full charge this way?
Some answers in a few days, after i tried and get more data -and hopefully not fried my device xD-.

Quick Update before the full article : my MotoG power management unit (pm8226) reaches up to 57°C when using it really little while charging, i don't think it is safe at this level of heat ...

If i had better tools, i would try to make accurate charts about :

  • pm8226 and battery T° (C) and Current (mA) against battery charge (%)
  • Battery charge (%) agaisnt time (min)
  • Charger efficiency (%) against Battery charge (%)
  • Monitoring surface T° with a IR camera
  • ...

Tuesday, June 9, 2015

CM12.1 : A few Drawbacks

I'm using CyanogenMod ROMs since the very beginning (started with a fork of CM6 called MiniCM6 by XDA Recognized Developer nobodyAtall).

Every CM version since then had more and more features, less and less bugs: the Sony-Ericsson X10mini (e10i, aka Robyn) started with the 'well-known' "SDcard safe to remove" reboot bug that crashed the device twice a day in the early miniCM6 ages...,
CM12.1 on Falcon (Motorola MotoG, XT1032) is far from this, a lot more mature, but still lacks a few things


CyanogenMod Logo
CM12.1
Some lacking Features and some issues

Here is a list of a few things that bothers me in CM12.1. Don't take it wrong, CM12.1 is nice and works pretty well, the following list is only a few "cosmetic" issues, user-experience related.

  • Expanded Desktop
    • Sometimes the nav bar doesn't show up when swiping up. (It needs to swipe down to display notifications, and then, nav bar shows up)
    • On some specific apps the nav bar is "ghost" meaning that once displayed (after swiping up) touching return buttons behaves as if the user had touched the content behind [like an ad........])
  • "Per App" Expanded desktop
    • Enabled for all is nice,
    • Per app settings is nice, -when "Enabled for all" is un-checked-
    • BUT why can't we make per app customisation, when "Enabled for All" is checked? that would help when the user wants the expanded desktop to be enabled for NEARLY all apps, but keeping a few apps with both nav and status bar.
  • 'The random Black Screen' with AmbientDisplay (with wave to wake, an pocket mode enabled)
    • In some rare cases, getting a notification wakes the device, but screen goes black (the only way to "fix" is force rebooting the device). Still no way to reproduce found yet,
  • LiveDisplay : Automatic settings
    • Automatic settings only work when location is enabled. A great addition would be to set time of start and time of end of 'night-mode' as whe can do with F.lux or RedShift for users that don't keep location enabled all-the-time.
  • LMK, is that really an issue?

Feel free to comment below, and i will update this article with your own feelings about the lacking features and the issues that bother you in CM12.1 (don't forget to tell your device if the issue is specific to a branch

For those complaining about Battery Life, don't forget to read this article ;-)

Friday, May 22, 2015

Moto G and Moto E : snapdragon 400 vs 200 Round2

A while ago we discussed about S200 vs S400 using the Old CPU Benchmark tool called "Linpack For Android", an app that had not been updated since ages. It was convenient for one reason : no update = no artificial MFLOPS increase due to app optimization ... but with CM11,12 and 12.1 i noticed huge performance drops in Linpack whereas i didn't feel any. It was time to try something else


Linpack for Android
A dead Benchmark app...

Linpack vs RgbenchMM on MotoE and MotoG:
RgbenchMM 1190MHz
Moto E (S200) Moto G (S400)
1 270 290
2 611 641
4 587 1280
Linpack 1190MHz
Moto E (S200) Moto G (S400)
Single 79 55
Multi 145 150
Per Core 72,5 50


Why is there so much disparity? the way the app make the CPU work and the way the workload has been set are different and so are results.
2 disparities :

  • In Linpack Single Core results for MotoE (S200, stock rooted KK) and MotoG (S400, CM12.1) are not similar although they should regarding the Core frequency and the similar architecture. (results Are similar with RgbenchMM)
  • MultiThread results are strange on Linpack : How a QuadCore CPU couldn't perform better than a DualCore one??
    • Linpack cannot handle more than 3 Threads
    • MotoG with CM12.1 starts with about 20% less MFLOPS with one core, and that is still the case in the multithreaded run... Not expected

Let's see how RgbenchMM performs in similar situation!


RgbenchMM
A Great CPU Benchmark app!

What do we see here?

  • Results for RgbenchMM are similar with MotoE and MotoG for single and dual threading benchmarks : this is expected in the way S200 and S400 are clocked at the same frequency.
  • 4 Threads run give more than 4 times the score of Single Thread one with the QuadCore S400
  • Results are strictly linear to the number of cores for S400 (r²=0.97, which is pretty good for Benchmarks results)
  • 4 threads benchmarking is only suitable for MotoG (the S400 is a quad-core) and gives inconsistent results with S200 (only dual-core, so 4 threads handled by 2 cores cannot give good results)
  • Little lower results with MotoE could be explained since the S200 has its 2 cores shared between Benchmark and System, whereas MotoG (S400) has still 3 and 2 cores left to handle system processes during single and dual threads (although 4 threads run is strictly twice higher than 2 threads ... so even with all the cores used S400 MFLOPS/Core results are better than S200?)
  • On both devices, MFLOPS/Core results are slightly better in Dual Thread run and Single Thread one
RgbenchMM dev explains the following:
it does about 6 loads and 8 multiply-accumalates (or 16 flops) inside the loop. The load instructions (FLDD) are also VFP instructions as are the FMACD instructions. Thus, the benchmark is testing the VFP performance almost exclusively. One other detail about the code is that the threads are setup so that ideally they are reading the same columns of one of the input matrices. This will be beneficial on architectures with at least 1 level of shared cache and thus you may see more than 2x speedup on a dual-core processor.
  • The Extremely lower MFLOPS/Core result for 4 threads run on the DualCore S200 shows how it would handle hard multitasking.


Is the Conclusion changed?
Compared to the previous S200 vs s400 article

  • Does Changing the Benchmark app modifies the conclusion about the S200 vs S400 comparison? No, i doesn't
  • Does it changes the "Pure CPU benchmarks: the limits" article conclusion? Not exactly, in fact the results can't be compared since my MotoG was running CM11 at that time, but it could explain the high gap between CM11 and stock KK : it was more a Linpack bias than a ROM issue, i'll be able to test Stock ROM on a S400 soon, then the final conclusion will come.

Wednesday, April 29, 2015

Random build of the day: a magnifying lens for Smartphone

One day, i woke up with the need of Google cardboard goggles... so i sought for two 45mm lenses in my everything-you-need-is-there (aka slag heap) and found an old broken cine-camera with an about 30mm focal lens: Not good for cardboard, but perfect for a magnifying tool!
The early prototype
Foamboard is the answer

The Lens:


The Prototype:

The Result
Some radom pics

And now here is a small chip:

  • First a pic of the set up
  • Then the chip
  • And finally a cropped version of the pic to see how good is the result!

Yeap, the gold wires aren't all in good shape ;-)

Monday, April 20, 2015

DIY of the day: Adding heat spreader to Value RAM modules

If you are not building a hardcore gaming computer, then some "Value" RAM modules can be enough. The modules (if made by well known brands like Corsair, G.Skill, ...) are still high quality but does not feature any heatspreader, from my own experiments those heatspreaders are not mandatory as RAM modules does not create much heat.
Though heatspreaders are usually cool and good looking: If you have some old modules with ones, why not swapping them to the newly bought modules?
Removing the Heatspreaders from old modules
Disclaimer: your warranty is now void!
Get the modules, find the metal clips (on my G.Skill modules, they are not painted). Lift one with your finger nail: it should jump easily.
Repeat for the second clip.
Swapping Modules
The tricky part
NB: Don't forget to remove the label from the new modules (this voids warranty.)
On my Corsair modules the labels could be easily removed without tearing: i reused them later.
Once the clips are gone, the heat spreader will unfold open. It's time to swap the RAM modules:
/!\ Be extremely careful on the side facing you ==> the labelled side is ALWAYS looking toward the CPU on ATX Motherboards
  1. Once roughly adjusted, fold back.
  2. Make sure to adjust the Heatspreader position without tearing or wearing the heat-pad (grey part on the picture), do not press it to tight either.
  3. place the clips back in place: you should hear a "click" and the clips should be in the state they were before unfolding.
If the labels survived the swap, then add them back to the heatspreader to identify the "CPU-looking" side of the modules. You can also use any other way to ease one-sight identification.
You now have your brand new value modules skinned as higher class ones, they won't reach a much lower CAS Latency, but might be able to support some more overclocking.
And... they simply look cool if not cooler than before