Showing posts with label Linux. Show all posts

Monday, August 22, 2016

Inateck USB3.0 to IDE + SATA converter: Read your old drives on recent devices!

A few friends of mine needed data recovery from old broken computers they had. Most of them had a tower form factor PC with old IDE drives or more recent ones with SATA port.
For those no issue: Having old working PCs around ... Only needed to drop the HDD in the PC and voilà.
But recently, two friends had Laptops IDE HDDs and i had no way to save their data!


Inateck USB3.0 to IDE + SATA converter
A kind of a Savior

To be able to read these old laptop IDE HDDs i needed something new. Here is what i needed: The ability to
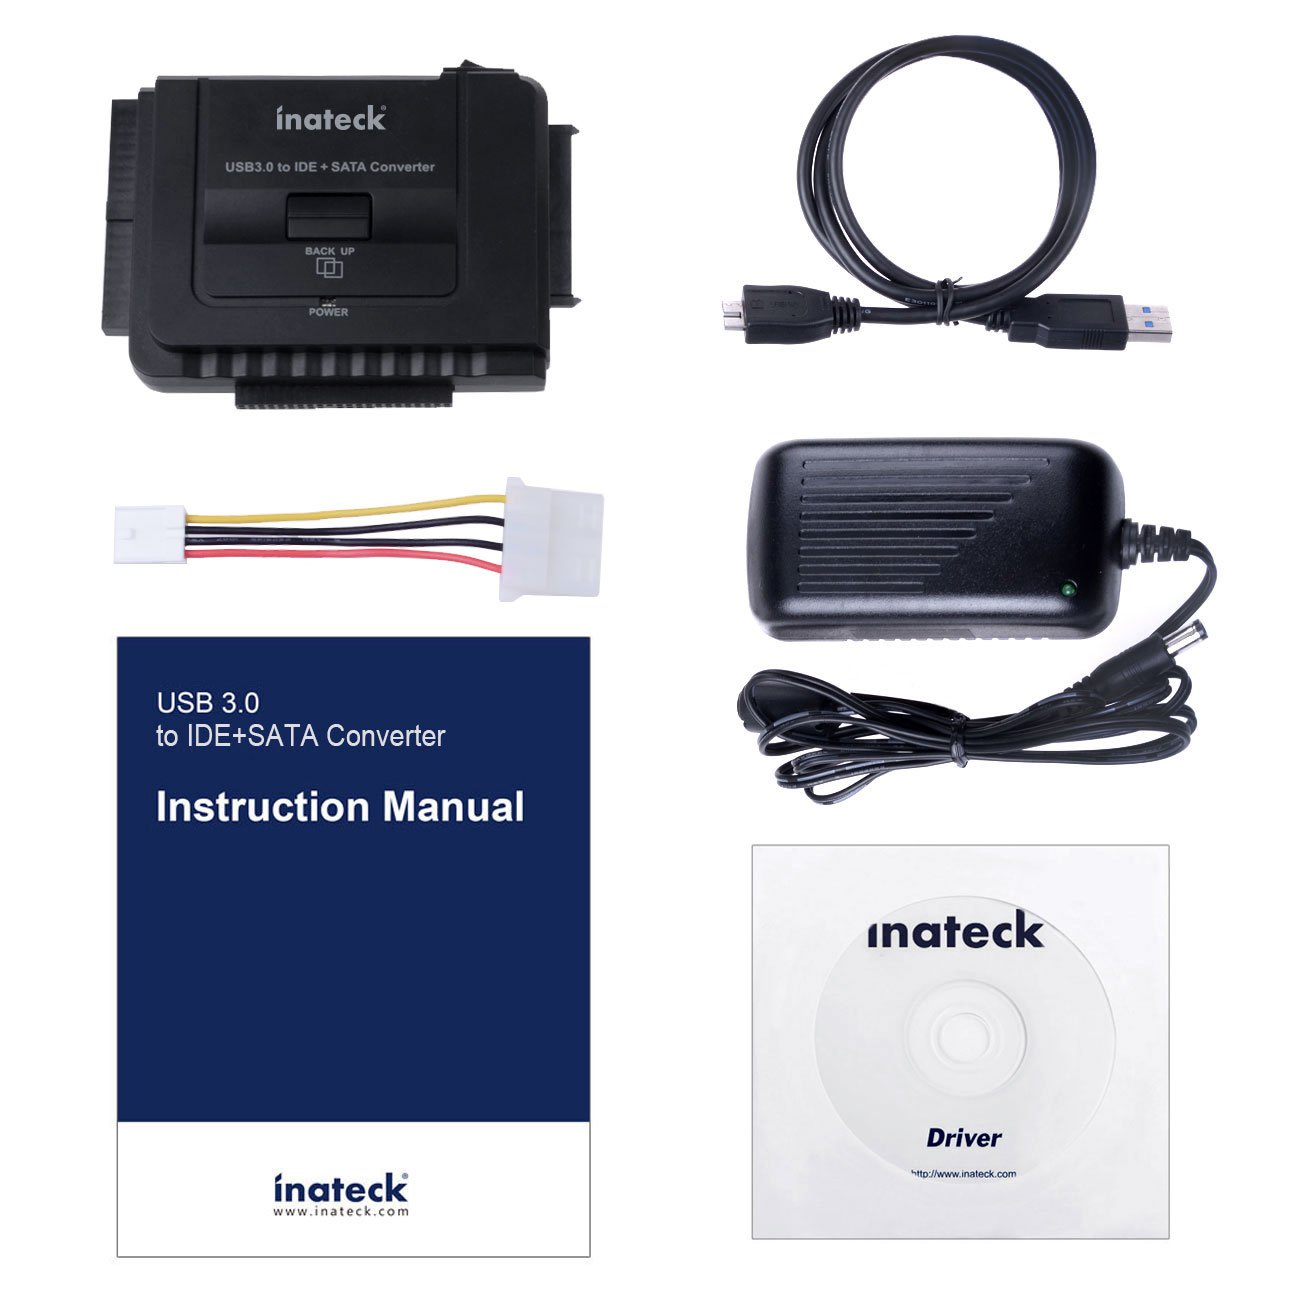
  • access SATA drives (to use 3.5" HDD on a laptop)
  • access old 3.5" IDE drives
  • access old 2.5" IDE drives (what I specifically needed this time)
  • an external PSU, that's not the poor 5V 500mA that will power a 3.5" IDEdrive
  • a power switch button to be able to "hot swap" the converter and "cold swap" the drives


After some search I came across the Inateck USB3.0 to IDE + SATA converter [I am not affiliated in any way with Amazon or Inateck, this is just a personal experience.]


Unboxing
What's inside the box (for real?)

Advertised content is contractual with the description of the product:
There is:
  • The converter itself (model UA2001)
  • USB3.0 cable
  • Molex power cable
  • Power Supply (12V, 2A rated, with a 20AWGX2C; isn't 20AWG rated for 1.5A max?)
  • Driver CD, useless on linux
  • Instructions manual, explaining how to use the backup software
Converter sepcs:
  • SATA port
  • 44 pins laptop IDE port
  • 40 pins 3.5" IDE port
  • On the back side:
  • On/Off switch
  • 12V 2A input port
  • USB3.0 port
  • 12V+5V output port (for the MOLEX adapter)
  • On the top:
  • Backup button
  • power LED


Notes: The converter is made of quite thick and solid black plastic (1mm thick on the edges), it is not "pretty" but it looks tough and reliable (ok, the last thing that i thought was tough -a Nitecore flashlight- failed me).
The molex adapter is made of small gauge wires (20AWG) so it shouldn't be able to power a Sony Optiarc AD-5260S (5V/1.5A,12V/2.5A!)


Does it actually work?
Yes it does its job

Due to wide compatibility, either the drive or the converter is hanging and not lying on the table. This is not for daily usage in a crowded place but more as an occasional help.
It even works with more than one devices plugged: the datasheet says "Operates with one IDE and one SATA HDD Simultaneously"

Actually lsblk recognises correctly 3 disks when the 2 IDE ports are populated and the SATA too (all with HDDs contrary to the picture above). (though i didn't tried to read/write massive amount of data simultaneously)
sda: internal HDD
sdb: SATA HDD
sdc: 2.5" IDE HDD
sdd: 3.5" IDE HD


So it works on Linux computers, but can we use it as USB OTG reader for an Android device?


OTG mode
What about android?
Let's say you don't have a PC (as if it died, but the HDD and your data are still safe but unreachable).
This adapter works flawlessly in OTG mode using a simple OTG cable used to read USB flash-drives on Android devices.
There's nothing to fear about, the power supply of the HDD is done by the adapter PSU so the Android device won't drain itself trying to power it.


Conclusion
Global feelings

The overall quality of the product is quite good considering the price.
I think it is a great product for the usage i have i.e. data recovery once in a while. But it is definitely not for professional or intense usage like 7hrs/day&5days/week. (less compatible and more specific devices would do the job better, like one for SATA, one for 40pins IDE and one for 44pins IDE)
It has great compatibility both with devices and hosts: it could read anything i tried (SATA/IDE HDDs, IDE and SATA CD/DVD drives) on any platform (Windows, Linux and Android [sadly CD/DVDs couldn't be read on my smartphone])

Monday, February 29, 2016

"Unbreak" Wacom Intuos CTL-480 on Linux Mint 17.3

With the 17.3 update of Linux Mint, the GUI that allow to set parameters for the Wacom CTL-480 broke (it doesn't recognize it anymore), but the CLI "xsetwacom" still works fine.
In my previous article i already had pointed that the GUI wasn't perfect, now it's worse ...
The only thing i need (for now) is to switch between Absolute and Relative modes for the stylus. So this will be the only thing i'll cover here (for now).
Let's workaround with a shell script that auto-switches between modes at each launch.


Xsetwacom commands
How to... by hand?

To display wacom devices attached there is the following piece of code:
xsetwacom --list devices

On my side, this outputs the following:
Wacom Intuos S Pen stylus        id: 14 type: STYLUS    
Wacom Intuos S Pen eraser        id: 15 type: ERASER    
Wacom Intuos S Pad pad           id: 16 type: PAD

To get the mode for the stylus:
xsetwacom get "Wacom Intuos S Pen stylus" mode

To set Relative mode for the stylus:
xsetwacom set "Wacom Intuos S Pen stylus" mode relative

The script
The power of sed
As the output of "xsetwacom --list devices" is longer than the string needed for the set command, let's trim it with sed: (the following command allows variation in the device name, as when the tablet is connected with the wireless module it has "(WL)" in its name.
Note that the gap after the used name is variable (it is made of zero or more space(s) and one indentation, the sed command takes care of that)


Then the script will check for the mode and switch between both!

To launch the script, refer to my old post about m505 remapping script.
The potential updates to this script will be available on my github.

Saturday, February 7, 2015

Wacom Intuos CTL-480 and Linux Mint 17.1

I recently purchased a Wacom Intuos Pen CTL-480, that i'm now using exclusively with Linux (mostly Linux Mint 17.1 x64 Cinnamon and Xfce edition)

This won't be an unboxing as there are many on the Internet. One observation though, i was pretty surprised that the wireless kit is 100% embedded in the tablet once plugged in it :


After the cover is placed back: everything is totally invisible. Well done Wacom! (when i purchased it i wasn't sure it would be that much stealth and feared it would make an hideous extension on the back)


Let's talk software: 
On Linux Mint 17.1 Cinnamon ==> Plug&Play (mostly)


Only thing missing : the four buttons on the tab are mapped by default, but cannot be reset using that utility. 
Playing with xev and xinput might be necessary.

MyPaint and GIMP perfectly handle the tab.
Major issue with battery status of the wireless kit:


Here is one of my very firsts paintings (using MyPaint and its marvelous brushes):

a few screenshots of steps to draw a baby dragon :


Monday, December 8, 2014

Installing Opera 26 and Adobe Flash Player? Pepper Flash!

After the Linux Mint 17.1 upgrade, why not trying Opera 26 ? (Opera had not been updated for Linux since Opera 12 before this new release)
Getting to the Opera Web Page and downloading the x64-only .deb :


Installing the deb package : (the package will seek for dependencies)


If you want Opera to get its updates with system updates, then :

Need Adobe Flash Player ?
What about using Pepper flash instead of Adobe oldies?


sudo apt-get install pepperflashplugin-nonfree

Restarting Opera, and we're done!


Wednesday, November 5, 2014

Master PDF Editor


Quick overview of Master PDF editor, another (user-friendly) PDF editor: 


>>> completing an old post about editing PDF on Linux <<<

This will only present the most basic features of MasterPDF editor 1.9.25.


Open the PDF you want to edit, here is a basic example of what teachers can give to students and say "simply print it, and you're done!" : 


Remove the Black Background, usually it is a picture, select it, and press suppr.

Ooooops, looks like text disappeared?

Use the "text selector tool"

Now Select with a long click the whole area (ctrl+a doesn't work : it will select both text and non-text objects)


Choose color to fill the selected text:


There is no way to invert colors in that software, but it is easy to export the image, edit it with your favorite image editor and then re-insert it.


As this software doesn't provide a tool to make arrows, make a pool of arrows with another one, and paste them there.


Now we have a Printer-friendly pdf :D

Tuesday, October 21, 2014

LSD-based Conky for Linux

LSD-molecule based Conky
>> make sure to have a look to how to install and use Conky <<


I used to like Manjaro Openbox edition Conky : 

But, some points were not fitting my needs : 
  • i didn't want that slighlty modified lysergic acid picture with M.A.N.J.A.R.O letters added to it.
  • No need of SWAP and /home use in my case
  • Better need % per CPU and acpitemp.

So, here is the re-worked picture (made to be displayed on dark background) : 

Paste the picture in ~/conky/conkypic/lsd.png (or edit the last line of the script to point where you placed the file)

And here is the reworked .conkyrc content : 
Code:
#Conky widget by m@, based on Manjaro Openbox edition conky
update_interval 1
total_run_times 0
net_avg_samples 1
cpu_avg_samples 1
imlib_cache_size 0
double_buffer yes
no_buffers yes
use_xft yes
xftfont Droid Sans:size=9
override_utf8_locale yes
text_buffer_size 2048
own_window yes
own_window_type desktop
own_window_transparent yes
own_window_hints undecorated,sticky,skip_taskbar,skip_pager
alignment top_right
gap_x 10
gap_y 60
minimum_size 280 0
default_bar_size 30 8
draw_shades no
default_color c5c5c5
default_shade_color 000000
color0 8DBC68
color1 c5c5c5
color2 c5c5c5
own_window_argb_visual yes
own_window_colour 000000
own_window_argb_value 0

TEXT
${goto 180}${color0}${font Droid Sans:style=bold:size=13}${voffset 40}${exec whoami}
${voffset -30}${font Droid Sans:style=Bold:size=12}${color}${goto 40}${uptime}
${goto 80}${color1}${font Droid Sans:style=Bold:size=12}${color1}${sysname}${color}${font}
${voffset 90}${goto 20}${font Droid Sans:style=bold:size=30}${time %H:%M}${font}${goto 175}${font Droid Sans:style=Bold:size=11}T°C
${goto 175}${font Droid Sans:style=Bold:size=11}${color1}${acpitemp}°C
${voffset 40}${goto 35}CPU0-1${color1}${goto 128}CPU2-3
${goto 38}${font Droid Sans:style=Bold:size=10}${cpu cpu0}-${cpu cpu1}%${goto 134}${font Droid Sans:style=Bold:size=11}${cpu cpu2}-${cpu cpu3}%${font Droid Sans:style=Bold:size=11}${color1}${font}
${font Droid Sans:style=Bold:size=11}${font}
${voffset 10}${goto 90}${font Droid Sans:style=Bold:size=11}RAM
${goto 90}${font Droid Sans:style=Bold:size=11}${memperc}%

${image ~/conky/conkypic/lsd.png -p 10,0}


.
This Conky displays the following : 

  • username
  • system uptime
  • time
  • acpitemp
  • cpu0 to cpu3 % use
  • RAM % use


>>> Dedicated git is now available <<<

Thursday, June 12, 2014

Installing Manjaro on a ASUS 1011PX netbook


Installing Manjaro Linux on a ASUS 1011PX netbook


If install process itself is quite easy thanks to a noob-proof installer, setting up power saving is more difficult (for an Arch noob as i am) : here is what i found that could fit to my specific needs.


First simply follow Optimized power settings explained in Manjaro's wiki :

- install 3.14.x kernel
- enabling Intel Microcode
- adding some advanced flags to grub : 
pcie_aspm=force acpi_osi=Linux acpi=force acpi_enforce_resources=lax i915.i915_enable_rc6=1 i915.i915_enable_fbc=1 i915.lvds_downclock=1 i915.semaphores=1

- installing TLP (more about TLP) [Don't forget to remove laptop-mode-tools first!]
- installing Linux Thermal Daemon


Then add a few optimizations to TLP : 
the ASUS 1011PX has an Atom n570 @1.66GHz
(available freq : 1667000, 1333000, 1000000kHz)

- Change CPU governor : 
CPU_SCALING_GOVERNOR_ON_AC=ondemand
CPU_SCALING_GOVERNOR_ON_BAT=conservative
(Atom CPU are really too slow using powersave governor [CPU will be stuck @1.0GHz]

- enable MAX freq (keeping default for min : don't uncomment the line):
#CPU_SCALING_MIN_FREQ_ON_AC=0
CPU_SCALING_MAX_FREQ_ON_AC=1667000
#CPU_SCALING_MIN_FREQ_ON_BAT=0

CPU_SCALING_MAX_FREQ_ON_BAT=1333000
(to save a little more juice so that conservative governor will only switch between 1.0 and 1.33GHz when on battery)

I didn't touched the other settings yet.


To see if TLP is doing is job : 
enter the following in terminal (once on AC, once on battery):
sudo tlp-stat | grep cpu 


Wednesday, February 19, 2014

Tip Of The Day (5) : Batch Script to resize pictures in linux (Nemo)

How to batch resize pictures using Nemo/Nautilus scripting


Don't forget to read the other tips:
  • Tip Of The Day (5) : Batch Script to resize pictures in linux (Nemo)

  • Tip Of The Day (4) : Bulk renaming files in linux
  • Tip Of The Day (3) : Linux Mint 13 and Petra Backports
  • Tip Of The Day (2) : Batch resizing pictures in linux
  • Tip Of The Day (1) : Screenshot 


  • See how to batch resize here


    Open your Nemo scripts folder /home/user_name/.gnome2/nemo-scripts

    Create a new file, and paste the following :


    Save and make it as executable, then enjoy ! 

    Go to the folder where pictures you need to resize are, right click in a blank space > scripts > resize

    For Custom pic size, edit this line : 
    for file in *.JPG; do convert $file -resize 800x600 resized-$file;done
    following my previous tip

    Wednesday, January 22, 2014

    Logitech Unifying Mice & Keyboard : pairing and setting up

    Logitech Unifying Mice & Keyboard : pairing and setting up


    Since there is no support form Logitech for Linux, a small tool have been created by Daniel Pavel : Solaar.


    • How to install on Ubuntu based distros : 


    • Launch it by typing solaar in terminal or seek for it in menu.
    (You may need to unplug/re-plug your receiver before Solaar can detect it.)

    here are some screen-shots of the app : 


    • For my specific device (M505), only Smooth scrolling and battery status are supported: 


    About Solaar : 


    Monday, January 20, 2014

    Tip Of The Day (4) : Bulk renaming files in linux

    Tip Of The Day (4) : Bulk renaming files in linux 

    Don't forget to read the other tips:
  • Tip Of The Day (5) : Batch Script to resize pictures in linux (Nemo)

  • Tip Of The Day (3) : Linux Mint 13 and Petra Backports
  • Tip Of The Day (2) : Batch resizing pictures in linux
  • Tip Of The Day (1) : Screenshot 
    • Xfce with Thunar : use the embedded Bulk renamer included in Thunar.


    • Linux Mint with Nemo (or Ubuntu based with Nautilus) : 

    1- Install pyrenamer 

    2- Use it "as it is" or integrate it in your file manager : 

    Nautilus and its fork, Nemo can use scripts to integrate new features.

    to get the right folder for your script, use either solutions : 

    - Right click on a file, search for scripts > open scripts folder
    - On Nautilus for Ubuntu 12.10 and before : ~/.gnome2/nautilus-scripts
    - On Nautilus for Ubuntu 13.04 and after : ~/.local/share/nautilus/scripts
    - On Nemo : ~/.gnome2/nemo-scripts

    Create a new file call it "Bulk rename" or whatever, open it with your text editor and paste the following : 

    #!/bin/bash
    #Launch Pyrenamer in current folder.
    #########################################################################
    # Nemo "Bulk Rename" Script #
    ##########################################################################
    if [ "$1" = "" ];then
    wdir=${NEMO_SCRIPT_CURRENT_URI#file://}
    wdir=${wdir//%20/ }
    else
    filetype=$(file "$1")
    filetype=${filetype##*: }
    if [ "$filetype" = "directory" ];then
    wdir=${NEMO_SCRIPT_SELECTED_FILE_PATHS%%$1*}
    wdir=$wdir/$1
    else
    wdir=${NEMO_SCRIPT_SELECTED_FILE_PATHS%%$1*}
    fi
    fi
    pyrenamer "$wdir"

    Save, and make it executable

    3- the script is now available when right clicking > scripts in the folder you want files to be renamed.


    Saturday, December 21, 2013

    Tip Of The Day (3) : Linux Mint 13 and Petra Backports

    Can't log in after the update of your Linux Mint with Petra Backports ?

    Don't forget to read the other tips:
  • Tip Of The Day (5) : Batch Script to resize pictures in linux (Nemo)

  • Tip Of The Day (4) : Bulk renaming files in linux
  • Tip Of The Day (2) : Batch resizing pictures in linux
  • Tip Of The Day (1) : Screenshot 


  • After the update i shot down my PC, and the following day i couldn't log in and got 
    "There was an error loading the theme XXXXXX" 
    And no way to log or anything

    Here is the Workaround : 

    1. Press ctrl+alt+F1 to switch to the console
    2. Log in
    3. Then type sudo killall mdm
    4.  and startx
    5. Cinnamon will start correctly (we've just bypassed the login window)
    if not done yet, make sure mint-meta-cinnamon , mint-mdm-themes are installed, and ubuntu-system-adjustments is up-to-date.

    ==> you've got a somewhat working PC now, but you'll need to repeat the process at every boot

    Now fixing the issue : 

    When the update was performed it erased the potentially custom theme we were using so mdm couldn't launch anything at boot ...

    • Once in Cinnamon trying to start mdm in order to change the theme fails.
    • Open /etc/mdm/mdm.conf as root
    • Search for  HTMLTheme= and GraphicalTheme=
    • Change theses values to : 
    HTMLTheme=Mint-XGraphicalTheme=linuxmint
    • Save the file, and reboot
    • Log in, open mdm and choose the theme you want (html or gdm/gtk)

    ==> You've now recovered a fully working Linux Mint 13 with the Petra backports ! 


    Alternate fix [source

    • Delete your MDM configuration with the command: sudo rm -f /etc/mdm/mdm.conf
    • Reset the MDM configuration with the command: sudo touch /etc/mdm/mdm.conf
    • Reboot the computer


    Sunday, November 10, 2013

    Tip Of The Day (2) : Batch resizing pictures in linux

    How to batch resize pictures in Linux (Mint and Ubuntu based distros)


    Don't forget to read the other tips:
  • Tip Of The Day (5) : Batch Script to resize pictures in linux (Nemo)

  • Tip Of The Day (4) : Bulk renaming files in linux
  • Tip Of The Day (3) : Linux Mint 13 and Petra Backports
  • Tip Of The Day (1) : Screenshot 


  • first install imagemagick
    sudo apt-get install imagemagick

    then open in terminal the folder containing your pictures you want to resize, and then type the following : 
    for file in *.[picture extension]; do convert $file -resize [size you want] [new-name]-$file; done

    example, for .JPG files that you want to resize in 800*600 (the file will be sized to fit in a 800*600 frame without destroying ratio)
    for file in *.JPG; do convert $file -resize 800x600 resized-$file; done

    Your resized pictures are now called resized-*.JPG (original pics are not overwritten) ie : 
    DSCF2248.JPG is now called resized-DSCF2248.JPG

    Now you have forum-ready pics, for fast upload and quick sharing ;)


    That's all folks !